A Sundial For South Africa
So - no calculations here, just simple and straightforward instructions on how to go about making a sundial. We will use a standard sheet of A4 paper as a template. A4 paper is 210mm by 297mm. We will also need a ruler and a sharp pencil (and possibly an eraser if you are like me and make lots of mistakes).
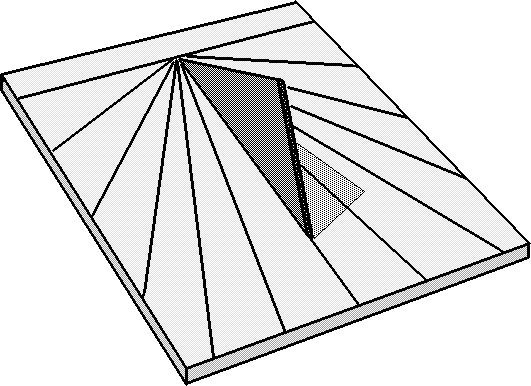
A sundial consists, basically, of two parts - the dial and the gnomon. Which is a fancy name for the triangular bit that sticks up in the centre.
The type of sundial we will make is known as a "horizontal" sundial.
Before you can commence making a dial you must determine the latitude of the place you live in - or where you are going to use the sundial. You can do this by looking in the gazetteer of a standard atlas. I include a list of some South African towns and cities. All of South Africa lies between 22 degrees South and 35 degrees South. If the minutes of latitude are greater than 30 then take the next whole number as your latitude. Example: De Aar is 30 degrees and 39 minutes South - the Latitude you want is 31 degrees. Bloemfontein is 29 degrees and 06 minutes South - the Latitude you want is 29 degrees.
| CITY | DEGREES LAT | MINUTES LAT |
|---|---|---|
| BEAUFORT WEST | 32 | 18 |
| BLOEMFONTEIN | 29 | 06 |
| CAPE TOWN | 33 | 59 |
| DE AAR | 30 | 39 |
| DURBAN | 29 | 57 |
| EAST LONDON | 33 | 00 |
| GRAHAMSTOWN | 33 | 19 |
| JOHANNESBURG | 26 | 10 |
| KIMBERLEY | 28 | 43 |
| KOEKENAAP | 31 | 32 |
| KURUMAN | 27 | 28 |
| LANGEBAANWEG | 32 | 59 |
| MOSSEL BAY | 34 | 11 |
| OUDTSHOORN | 33 | 35 |
| PIETERMARITZBURG | 29 | 35 |
| PIETERSBURG | 23 | 54 |
| POFADDER | 29 | 10 |
| PORT ELIZABETH | 33 | 58 |
| PRETORIA | 25 | 45 |
| PRIESKA | 29 | 40 |
| QUEENSTOWN | 31 | 52 |
| SPRINGBOK | 29 | 42 |
| SUTHERLAND | 32 | 23 |
| UPINGTON | 28 | 25 |
| WELKOM | 28 | 00 |
| WORCESTER | 33 | 39 |
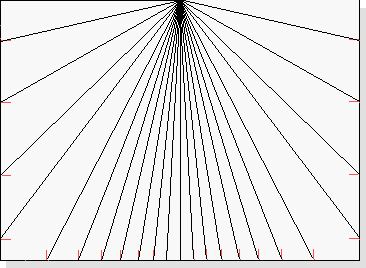
Divide your sheet of A4 paper by drawing a line in the middle of the long side across the sheet. Measure 148.5 from the top, on both sides, and draw a line across the sheet.


| 22° | 23° | 24° | 25° | 26° | 27° | 28° | 29° | 30° | 31° | 32° | 33° | 34° | 35° |
|---|---|---|---|---|---|---|---|---|---|---|---|---|---|
| 10 | 11 | 11 | 12 | 12 | 13 | 13 | 13 | 14 | 14 | 15 | 15 | 15 | 16 |
| 21 | 22 | 23 | 24 | 25 | 26 | 26 | 27 | 28 | 29 | 30 | 31 | 31 | 32 |
| 33 | 34 | 35 | 37 | 38 | 39 | 41 | 42 | 43 | 45 | 46 | 47 | 49 | 50 |
| 45 | 47 | 49 | 51 | 53 | 55 | 57 | 59 | 61 | 62 | 64 | 66 | 68 | 70 |
| 60 | 63 | 66 | 68 | 71 | 73 | 76 | 78 | 81 | 83 | 85 | 88 | 90 | 92 |
| 79 | 82 | 85 | 89 | 92 | 95 | 99 | 102 | 105 | 108 | 111 | 114 | 117 | 120 |
| 103 | 107 | 111 | 116 | 120 | 124 | 128 | 133 | 137 | 141 | 145 | 1 | 6 | 11 |
| 136 | 142 | 148 | 7 | 14 | 21 | 27 | 33 | 39 | 44 | 48 | 53 | 57 | 61 |
| 46 | 53 | 59 | 64 | 70 | 75 | 79 | 83 | 87 | 91 | 94 | 97 | 100 | 103 |
| 104 | 108 | 112 | 116 | 119 | 122 | 125 | 128 | 130 | 133 | 135 | 137 | 139 | 141 |
| 158 | 160 | 162 | 164 | 165 | 167 | 168 | 170 | 171 | 172 | 173 | 174 | 175 | 176 |
Assuming we chose 29° for our reference latitude .....
| 22° | 23° | 24° | 25° | 26° | 27° | 28° | 29° | 30° | 31° | 32° | 33° | 34° | 35° |
|---|---|---|---|---|---|---|---|---|---|---|---|---|---|
| 10 | 11 | 11 | 12 | 12 | 13 | 13 | 13 | 14 | 14 | 15 | 15 | 15 | 16 |
| 21 | 22 | 23 | 24 | 25 | 26 | 26 | 27 | 28 | 29 | 30 | 31 | 31 | 32 |
| 33 | 34 | 35 | 37 | 38 | 39 | 41 | 42 | 43 | 45 | 46 | 47 | 49 | 50 |
| 45 | 47 | 49 | 51 | 53 | 55 | 57 | 59 | 61 | 62 | 64 | 66 | 68 | 70 |
| 60 | 63 | 66 | 68 | 71 | 73 | 76 | 78 | 81 | 83 | 85 | 88 | 90 | 92 |
| 79 | 82 | 85 | 89 | 92 | 95 | 99 | 102 | 105 | 108 | 111 | 114 | 117 | 120 |
| 103 | 107 | 111 | 116 | 120 | 124 | 128 | 133 | 137 | 141 | 145 | 1 | 6 | 11 |
| 136 | 142 | 148 | 7 | 14 | 21 | 27 | 33 | 39 | 44 | 48 | 53 | 57 | 61 |
| 46 | 53 | 59 | 64 | 70 | 75 | 79 | 83 | 87 | 91 | 94 | 97 | 100 | 103 |
| 104 | 108 | 112 | 116 | 119 | 122 | 125 | 128 | 130 | 133 | 135 | 137 | 139 | 141 |
| 158 | 160 | 162 | 164 | 165 | 167 | 168 | 170 | 171 | 172 | 173 | 174 | 175 | 176 |
we should now have a column of figures that looks like this:
| 13 |
| 27 |
| 42 |
| 59 |
| 78 |
| 102 |
| 133 |
| 33 |
| 83 |
| 128 |
| 170 |
These figures represent distances in millimetres from the bisector at the bottom edge of the paper. Mark, on both sides, each distance. When the figures suddenly get smaller (those that are underlined) it means you must "turn the corner" and start marking from the bottom of the paper towards the top line.
As shown in the following figure.

| 22° | 23° | 24° | 25° | 26° | 27° | 28° | 29° | 30° | 31° | 32° | 33° | 34° | 35° |
|---|---|---|---|---|---|---|---|---|---|---|---|---|---|
| 85 | 89 | 93 | 98 | 102 | 107 | 112 | 116 | 121 | 126 | 131 | 136 | 142 | 147 |
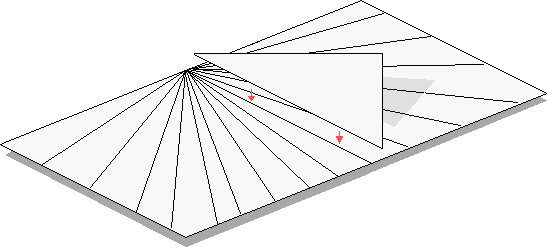
Using the number we found in the table measure in millimetres from the bottom of the sheet of A4 paper as shown in the figure. Draw a line from the opposite corner to the mark on the opposite edge. The triangle represents the gnomon. The size is not important, just the angle. Of course it should be large enough to cast a shadow on the dial we have made.

Mount the gnomon on the 12 o'clock line of the dial with the sharp side pointing toward the top as shown in the figure below.
Now for the bad news.......
However all is not lost. Every 1° of longitude represents 4 minutes of time. And every minute of longitude represents 4 seconds of time. Determine your longitude by looking in the gazetteer once again.
Convert the degrees and minutes to decimal degrees by dividing the minutes of longitude by sixty and adding them to the degrees. Thus 18° 22 minutes would become 18° plus 22/60 = 0.3666.... or 18.37° rounded off to the nearest 100th. Now subtract this from 30°. 30 - 18.37 = 11.63. Multiply that by 4 and the answer is 46.52 minutes of time. Or 46 minutes and 31 seconds of time (0.52 times 60 to get seconds).
You need do this calculation only once. If you live west of the 30° line (most of South Africa) then you must remember to add this sum to the sundial time. If you live East it must be subtracted.
To sum up:
It is a good idea to add this information to your dial face so that you will remember it always. Something like: Longitude correction: Add 41 minutes 22 seconds printed on the face would help.
Bad news part two: Because the length of "real" days vary the sundial is only accurate on a few days every year. This is partially explained in the following section.
Bad news part three: Refraction causes errors too!
The Sundial makes use of the apparent solar day to tell time. Unfortunately the apparent solar day has varying lengths which are inconvenient to modern man. Thus the "mean solar day" has been adopted as a convenient average.
However when one depends on a shadow made by the real sun then it becomes difficult to reconcile "sundial time" with "civil time" as the two times are known.
If one were to observe, from the exact same spot, the sun every ten days at exactly the same "civil time" for each observation and plot its position on a chart the following graph will be produced: (this is known as the "analemma" or daily declination of the sun which is from Latin but derived from Greek "analemma" meaning "pedestal" which originally referred to the base of a sundial.)

As we have seen the sun "wanders" around the sky during the year, and we depend on the shadow it casts for our sundial time, we need some method of correcting for this "wander".

Intially, assuming our dial is correctly aligned, we would make the correction for longitude by adding or subtracting the sum we worked out earlier. However this could bring us only within 20 minutes or so of clock time! Further adjustments are needed. Most of them require some advanced mathematical skills.
Refraction is the way the sun's rays are "bent" as they move through our atmosphere. It varies from a maximum at sunrise to a minimum at local noon. The effect is greater in winter than in summer. In fact refraction causes a different error all the time.
The equation of time is affected by factors such as the tilt of the earth's axis and the speed around the sun. Other factors such as precession and nutation also play a role. Calculating the corrections for these influences becomes quite a nightmare to a novice and necessitates knowledge of annual variations not easily come by.
Programs are available on the Web which take out the slog work and output a "total correction" for your locality. A nice easy one to use is the Dialists Companion which is available to download as Shareware from the North American Sundial Society
The North American Sundial Society can be found on by clicking here.
